
領先一步
VMware 提供培訓和認證,以加速您的進度。
瞭解更多哈囉,Spring 的粉絲們!在這次的 Spring 小技巧中,我們將探討一個我非常重視的主題:整合!是的,您可能還記得 Spring 小技巧 的第一個部分就是探討 Spring Integration。如果您還沒看過那個部分,您應該去看看。所以,雖然我們不會重新探討 Spring Integration 的基礎知識,但我們會深入研究 Spring Integration 中支援的一個領域:FTP。FTP 完全是關於檔案同步。廣義地說,在企業應用程式整合 (EAI) 的世界中,我們有四種整合類型:檔案同步、RPC、資料庫同步和訊息傳遞。
當人們想到雲原生應用程式時,檔案同步絕對不是大多數人會想到的,但您會驚訝於金融界有多少部分是由檔案同步(FTP、SFTP、AS2、FTPS、NFS、SMB 等)整合所運作的。當然,他們大多數都使用更安全的變體,但重點仍然有效。在本影片中,我們將探討如何使用 Spring Integration 的 FTP 支援,一旦您了解了這一點,就很容易將其應用於其他變體。
請容忍我在此自我吹噓一下:我認為我已經了解了所有需要了解的關於 Spring Integration 的 FTP 支援的知識,因為十多年前我在完善 Iwein Fuld 的原始原型程式碼方面發揮了重要作用,並且我貢獻了原始的 FTPS 和 SFTP 配接器。在過去的十年中,令人驚訝的是,Spring Integration 團隊新增了大量的新功能,並修復了我的原始程式碼中的所有錯誤!我喜歡所導入的內容。
因此,首先:我們需要設定一個 FTP 伺服器。Spring Integration 的大多數支援都作為已安裝的 FTP 伺服器的用戶端工作。因此,您使用哪個 FTP 伺服器都沒關係。但是,我建議您使用 Apache FTPServer 專案。這是一個 Apache Mina 專案的子專案,而 Apache Mina 專案,順便說一下,是 Netty 專案的前身。Apache FTP Server 是一個超級可擴展、輕量級、全 Java 實作的 FTP 協定。而且,您可以輕鬆地將其嵌入到 Spring 應用程式中。我已經在 本影片的 Github 儲存庫 中這樣做了。我定義了一個自訂的 UserManager 類別來管理 FTP 使用者帳戶。自訂的 UserManager 與具有簡單表格 ftp_user 的本機 PostgreSQL 資料庫對話,其結構描述定義為具有以下欄位的表格
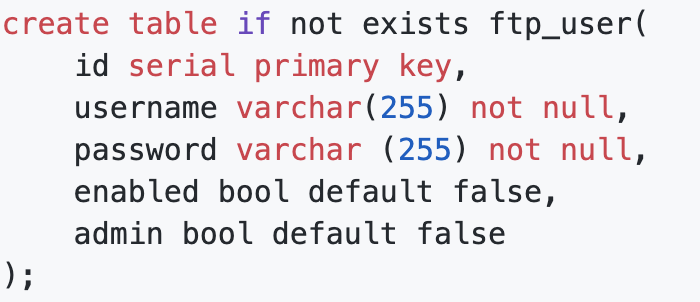
我在其中有兩個使用者,jlong 和 grussell,它們的密碼都是 pw。我已將 enabled 和 admin 設定為兩個記錄的 true。我們稍後會使用這兩個帳戶,因此請確保將它們插入到表格中,如下所示。
insert into ftp_user(username, password, enabled, admin) values ('jlong', 'pw', true, true);
insert into ftp_user(username, password, enabled, admin) values ('grussell', 'pw', true, true);
我不打算在此處重新印出 FTP 伺服器的完整程式碼。如果您想仔細閱讀,我建議您查看 FtpServerConfiguration 和 FtpUserManager。
在大多數情況下,我們無法變更 FTP 伺服器。如果我們想要收到遠端檔案系統中任何變更的通知,我們的用戶端需要連線、掃描目錄,並將其與先前的已知狀態進行比較。基本上,用戶端會計算差異並發布事件。但是,如果 FTP 伺服器可以在發生某些事情時廣播事件,那不是很好嗎?這樣,就可以確定發生了什麼事情。而且毫無疑問,我們觀察到了每一個變更。如果我們使用任何其他 FTP 伺服器,這將更多的是一種願望,而不是一種可能性。但是,由於我們使用的是 Apache FTP Server,Spring Integration 為我們提供了一些有趣的機會。我們可以安裝一個 FTPlet,有點像一個篩選器,它將 FTP 伺服器上的任何重要事件廣播為 ApplicationContext 事件。然後,我們可以使用 Spring Integration 將有趣的事件發布為我們可以在 Spring Integration 中處理的訊息。此功能是 Spring Integration 中的一項新功能。
package ftp;

import lombok.extern.log4j.Log4j2;
import org.springframework.context.annotation.Bean;
import org.springframework.context.annotation.Configuration;
import org.springframework.integration.dsl.IntegrationFlow;
import org.springframework.integration.dsl.IntegrationFlows;
import org.springframework.integration.dsl.MessageChannels;
import org.springframework.integration.event.inbound.ApplicationEventListeningMessageProducer;
import org.springframework.integration.ftp.server.ApacheMinaFtpEvent;
import org.springframework.integration.ftp.server.ApacheMinaFtplet;
import org.springframework.integration.handler.GenericHandler;
import org.springframework.messaging.MessageChannel;

@Log4j2
@Configuration
class IntegrationConfiguration {

	@Bean
	ApacheMinaFtplet apacheMinaFtplet() {
		return new ApacheMinaFtplet();
	}

	@Bean
	MessageChannel eventsChannel() {
		return MessageChannels.direct().get();
	}

	@Bean
	IntegrationFlow integrationFlow() {
		return IntegrationFlows.from(this.eventsChannel())
			.handle((GenericHandler<ApacheMinaFtpEvent>) (apacheMinaFtpEvent, messageHeaders) -> {
                log.info("new event: " + apacheMinaFtpEvent.getClass().getName() +
                     ':' + apacheMinaFtpEvent.getSession());
				return null;
			})
			.get();
	}

	@Bean
	ApplicationEventListeningMessageProducer applicationEventListeningMessageProducer() {
		var producer = new ApplicationEventListeningMessageProducer();
		producer.setEventTypes(ApacheMinaFtpEvent.class);
		producer.setOutputChannel(eventsChannel());
		return producer;
	}
}
此範例設定了一個 Spring Integration 訊息流程,用於監聽相關事件並將它們記錄下來。顯然,我們對這個新資訊做了太多事情,但要記住的是… 我們完全可以!這裡有很多機會。我們可以透過 Apache Kafka、RabbitMQ 或 JMS 發布這些事件,以便其他節點做出回應。我們可以發送電子郵件邀請某人參與某些工作流程。天空才是極限!
現在,我們有一個在埠 7777 上運作的伺服器,我們可以使用用戶端連線。我使用 Filezilla。無論您使用哪個用戶端,都請嘗試登入到主機 localhost、埠 7777、使用者 jlong 和密碼 pw 上運作的 FTP 伺服器。上傳檔案、重新命名它等等,然後檢查應用程式的主控台,您會看到活動反映在事件中。
我們有一個運作中的伺服器。讓我們看看 Spring Integration 如何作為您服務的用戶端。我們將使用最簡單的抽象,並逐步發展到更複雜的功能。在 Spring Initializr 上建立一個新專案,新增 Lombok、Spring Integration,然後選擇最新版本的 Java。然後按一下 Generate,並在您的 IDE 中開啟專案。
我們將使用我們之前定義的兩個帳戶。讓我們在 application.properties 中設定它們。
##
## Josh
ftp1.username=jlong
ftp1.password=pw
ftp1.port=7777
ftp1.host=localhost
##
## Gary
ftp2.username=grussell
ftp2.password=pw
ftp2.port=7777
ftp2.host=localhost
FtpRemoteFileTemplate我們可以與 FTP 伺服器互動的最簡單方法是使用作為 Spring Integration 一部分提供的非常方便的 FtpRemoteFileTemplate。這是一個範例。第一個範例定義了一個 DefaultFtpSessionFactory,用於建立與其中一個 FTP 帳戶的連線。然後,我們使用該 DefaultFtpSessionFactory 定義一個 FtpRemoteFileTemplate。然後,我們定義一個初始化器,該初始化器使用該 FtpRemoteFileTemplate 將遠端檔案系統上的檔案 hello.txt 讀取到本機檔案 $HOME/Desktop/hello-local.txt。這再簡單不過了!
package com.example.integration;

import lombok.extern.log4j.Log4j2;
import org.springframework.beans.factory.InitializingBean;
import org.springframework.beans.factory.annotation.Value;
import org.springframework.context.annotation.Bean;
import org.springframework.context.annotation.Configuration;
import org.springframework.context.annotation.Profile;
import org.springframework.integration.ftp.session.DefaultFtpSessionFactory;
import org.springframework.integration.ftp.session.FtpRemoteFileTemplate;

import java.io.File;
import java.io.FileOutputStream;

@Log4j2
@Configuration
class FtpTemplateConfiguration {

	@Bean
	InitializingBean initializingBean(FtpRemoteFileTemplate template) {
		return () -> template
			.execute(session -> {
				var file = new File(new File(System.getProperty("user.home"), "Desktop"), "hello-local.txt");
				try (var fout = new FileOutputStream(file)) {
					session.read("hello.txt", fout);
				}
				log.info("read " + file.getAbsolutePath());
				return null;
			});
	}

	@Bean
	DefaultFtpSessionFactory defaultFtpSessionFactory(
		@Value("${ftp1.username}") String username,
		@Value("${ftp1.password}") String pw,
		@Value("${ftp1.host}") String host,
		@Value("${ftp1.port}") int port) {
		DefaultFtpSessionFactory defaultFtpSessionFactory = new DefaultFtpSessionFactory();
		defaultFtpSessionFactory.setPassword(pw);
		defaultFtpSessionFactory.setUsername(username);
		defaultFtpSessionFactory.setHost(host);
		defaultFtpSessionFactory.setPort(port);
		return defaultFtpSessionFactory;
	}

	@Bean
	FtpRemoteFileTemplate ftpRemoteFileTemplate(DefaultFtpSessionFactory dsf) {
		return new FtpRemoteFileTemplate(dsf);
	}
}
下一個範例探討如何使用 FTP 輸入配接器在遠端檔案系統上有新檔案時接收新的 Message<File>。輸入或輸出配接器是一種單向訊息傳遞元件。輸入配接器將遠端系統中的事件轉譯為傳遞到 Spring Integration 流程中的新訊息。輸出配接器將 Spring Integration Message<T> 轉譯為遠端系統中的事件。在這種情況下,每當遠端檔案系統上出現新檔案時,FTP 輸入配接器都會將 Message<T> 發布到 Spring Integration 程式碼中。
跟之前一樣,我們先配置一個 DefaultFtpSessionFactory。然後,我們配置一個 FTP inbound adapter,當伺服器上出現符合遮罩 .txt 的任何檔案時,它會自動同步遠端檔案系統。這個 inbound adapter 會取得遠端檔案,將它移動到本地目錄,然後發布一個 Message<File>,我們可以對它做任何我們想做的事情。在這裡,我只是簡單地記錄訊息。試試看!上傳一個檔案,例如 foo.txt,到 FTP 伺服器,你會發現它在不到一秒的時間內就被下載並儲存在本地檔案系統的 $HOME/Desktop/local 目錄下。
package com.example.integration;

import lombok.extern.log4j.Log4j2;
import org.springframework.beans.factory.annotation.Value;
import org.springframework.context.annotation.Bean;
import org.springframework.context.annotation.Configuration;
import org.springframework.context.annotation.Profile;
import org.springframework.integration.dsl.IntegrationFlow;
import org.springframework.integration.dsl.IntegrationFlows;
import org.springframework.integration.ftp.dsl.Ftp;
import org.springframework.integration.ftp.session.DefaultFtpSessionFactory;

import java.io.File;
import java.util.concurrent.TimeUnit;

@Log4j2
@Configuration
class InboundConfiguration {

	@Bean
	DefaultFtpSessionFactory defaultFtpSessionFactory(
		@Value("${ftp1.username}") String username,
		@Value("${ftp1.password}") String pw,
		@Value("${ftp1.host}") String host,
		@Value("${ftp1.port}") int port) {
		DefaultFtpSessionFactory defaultFtpSessionFactory = new DefaultFtpSessionFactory();
		defaultFtpSessionFactory.setPassword(pw);
		defaultFtpSessionFactory.setUsername(username);
		defaultFtpSessionFactory.setHost(host);
		defaultFtpSessionFactory.setPort(port);
		return defaultFtpSessionFactory;
	}

	@Bean
	IntegrationFlow inbound(DefaultFtpSessionFactory ftpSf) {
		var localDirectory = new File(new File(System.getProperty("user.home"), "Desktop"), "local");
		var spec = Ftp
			.inboundAdapter(ftpSf)
			.autoCreateLocalDirectory(true)
			.patternFilter("*.txt")
			.localDirectory(localDirectory);
		return IntegrationFlows
			.from(spec, pc -> pc.poller(pm -> pm.fixedRate(1000, TimeUnit.MILLISECONDS)))
			.handle((file, messageHeaders) -> {
				log.info("new file: " + file + ".");
				messageHeaders.forEach((k, v) -> log.info(k + ':' + v));
				return null;
			})
			.get();
	}
}
現在,作為我們的最後一站,讓我們看看 Spring Integration FTP 閘道。在 Spring Integration 中,閘道是一個將資料發送到(遠端服務)的元件,然後取得回應並將其帶回 Spring Integration 流程。或者,閘道也可以從遠端系統接收傳入請求,將其帶入 Spring Integration 流程,然後將回應發送回去。無論哪種方式,閘道都是一個雙向訊息元件。在這個例子中,FTP 閘道接收 Spring Integration 的 Message<T>,將它們發送到 FTP 伺服器並上傳,一旦上傳完成,就會將回應(如果有的話,就是確認訊息)送回 Spring Integration 程式碼。
如果我們只做這些,本身就很有用了。但是,對於最後一個例子,我希望根據一些條件,有條件地將檔案上傳到兩個 FTP 伺服器帳戶中的一個。你可以想像一下這個情境。一個 HTTP 請求進來,它被轉換成一個 Message<T>,進入 Spring Integration 流程,然後它前往閘道。唯一的問題是:資料應該上傳到哪個帳戶?如果打算給 John 的檔案被上傳到 Jane 的帳戶,Jane 可能不會高興。
我們將使用一個 DelegatingSessionFactory<FTPFile>。這個 DelegatingSessionFactory<FTPFile> 有兩個建構子。一個接受一個 SessionFactoryLocator,你可以用它來在執行時決定要使用哪個 FTP 帳戶。另一個接受一個 Map<String, SessionFactory>,這會產生一個 SessionFactoryLocator,它會查看傳入訊息的某些屬性(由你決定是哪個),並將其用作地圖中的查找鍵。
我們需要一些方法來啟動這個 pipeline,所以我建立了一個簡單的 HTTP endpoint,它接受一個 HTTP POST 訊息,並使用一個路徑變數來建立一個鍵,然後將其發送到 integration flow。這個 integration flow 有三個步驟。第一階段查看傳入的訊息,並為 DelegatingSessionFactory 配置 thread-local 鍵,然後將訊息轉發到閘道,由閘道負責將檔案上傳到遠端檔案系統,然後將上傳的回應轉發到另一個清除 thread-local 鍵的元件。
package com.example.integration;

import org.apache.commons.net.ftp.FTPFile;
import org.springframework.beans.factory.annotation.Value;
import org.springframework.context.annotation.Bean;
import org.springframework.context.annotation.Configuration;
import org.springframework.context.annotation.Profile;
import org.springframework.expression.common.LiteralExpression;
import org.springframework.integration.dsl.IntegrationFlow;
import org.springframework.integration.dsl.MessageChannels;
import org.springframework.integration.file.remote.gateway.AbstractRemoteFileOutboundGateway;
import org.springframework.integration.file.remote.session.DelegatingSessionFactory;
import org.springframework.integration.file.support.FileExistsMode;
import org.springframework.integration.ftp.dsl.Ftp;
import org.springframework.integration.ftp.session.DefaultFtpSessionFactory;
import org.springframework.integration.ftp.session.FtpRemoteFileTemplate;
import org.springframework.integration.handler.GenericHandler;
import org.springframework.messaging.MessageChannel;
import org.springframework.messaging.support.MessageBuilder;
import org.springframework.web.servlet.function.RouterFunction;
import org.springframework.web.servlet.function.ServerResponse;

import java.util.Map;

import static org.springframework.web.servlet.function.RouterFunctions.route;

@Configuration
@Profile("gateway")
class GatewayConfiguration {

	@Bean
	MessageChannel incoming() {
		return MessageChannels.direct().get();
	}

	@Bean
	IntegrationFlow gateway(
		FtpRemoteFileTemplate template,
		DelegatingSessionFactory<FTPFile> dsf) {
		return f -> f
			.channel(incoming())
			.handle((GenericHandler<Object>) (key, messageHeaders) -> {
				dsf.setThreadKey(key);
				return key;
			})
			.handle(Ftp
				.outboundGateway(template, AbstractRemoteFileOutboundGateway.Command.PUT, "payload")
				.fileExistsMode(FileExistsMode.IGNORE)
				.options(AbstractRemoteFileOutboundGateway.Option.RECURSIVE)
			)
			.handle((GenericHandler<Object>) (key, messageHeaders) -> {
				dsf.clearThreadKey();
				return null;
			});
	}

	@Bean
	DelegatingSessionFactory<FTPFile> dsf(Map<String, DefaultFtpSessionFactory> ftpSessionFactories) {
		return new DelegatingSessionFactory<>(ftpSessionFactories::get);
	}

	@Bean
	DefaultFtpSessionFactory gary(@Value("${ftp2.username}") String username, @Value("${ftp2.password}") String pw, @Value("${ftp2.host}") String host, @Value("${ftp2.port}") int port) {
		return this.createSessionFactory(username, pw, host, port);
	}

	@Bean
	DefaultFtpSessionFactory josh(@Value("${ftp1.username}") String username, @Value("${ftp1.password}") String pw, @Value("${ftp1.host}") String host, @Value("${ftp1.port}") int port) {
		return this.createSessionFactory(username, pw, host, port);
    }

    @Bean
	FtpRemoteFileTemplate ftpRemoteFileTemplate(DelegatingSessionFactory<FTPFile> dsf) {
		var ftpRemoteFileTemplate = new FtpRemoteFileTemplate(dsf);
		ftpRemoteFileTemplate.setRemoteDirectoryExpression(new LiteralExpression(""));
		return ftpRemoteFileTemplate;
	}


	private DefaultFtpSessionFactory createSessionFactory(String username, String pw, String host, int port) {
		var defaultFtpSessionFactory = new DefaultFtpSessionFactory();
		defaultFtpSessionFactory.setPassword(pw);
		defaultFtpSessionFactory.setUsername(username);
		defaultFtpSessionFactory.setHost(host);
		defaultFtpSessionFactory.setPort(port);
		return defaultFtpSessionFactory;
    }

	@Bean
	RouterFunction<ServerResponse> routes() {
		var in = this.incoming();
		return route()
			.POST("/put/{sfn}", request -> {
				var name = request.pathVariable("sfn");
				var msg = MessageBuilder.withPayload(name).build();
				var sent = in.send(msg);
				return ServerResponse.ok().body(sent);
			})
			.build();
	}
}
你可以透過執行 curl -XPOST https://127.0.0.1:8080/put/one 來嘗試這個流程。這會將檔案上傳到 bean 名稱為 one 的 FTP 帳戶。嘗試 curl -XPOST https://127.0.0.1:8080/put/two 將檔案上傳到 bean 名稱為 two 的 FTP 帳戶。
在本期 Spring Tips 中,我們研究了如何處理各種 FTP integration 情境。你可以使用在這裡學到的東西來與 framework 中對遠端檔案系統的其他支援配合使用。