
領先一步
VMware 提供培訓和認證,以加速您的進展。
了解更多嗨,Spring 愛好者們!歡迎來到另一期 Spring 提示!在這一期中,我們將重新探討我們在之前的兩個影片(分散式追蹤和指標收集)中討論過的兩個主題,從極好的 Tanzu Wavefront 可觀測性平台的角度來看。
正如上面提到的,第一部影片可以追溯到 2017 年初,探討了使用 Spring Cloud Sleuth 和 OpenZipkin 進行分散式追蹤。Spring Cloud Sleuth 是一個用於捕捉訊息從一個節點流向另一個節點的抽象概念。它可以幫助您了解訊息如何在系統中移動。Spring Cloud Sleuth 與 Spring Boot 應用程式中所有常用的入口和出口點整合。使用 RestTemplate 或反應式的 WebClient 或 Spring Cloud Feign 發出 HTTP 請求?它能運作。接收對使用 Spring 建構的傳統(基於 Servlet)或反應式 HTTP 端點的 HTTP 請求?它能運作。使用 Spring Cloud Stream 或 Spring Integration 發送或接收訊息?沒錯。您猜對了。它就是能運作。您也不需要做任何事情。
只需將 Spring Cloud Sleuth starter 新增到類別路徑,Spring Cloud Sleuth 就會完成剩下的工作。它可以將其捕獲的資訊轉發到帶外追蹤伺服器,例如 OpenZipkin。有些甚至提供與 Zipkin 相容的代理,例如 Google Cloud StackDriver 追蹤。我喜歡最後一點,因為它幾乎感覺我們已經繞了一圈。請記住,Zipkin 的靈感來自於 Google 的 Dapper 白皮書等。很高興我們可以反過來使用 Zipkin 與 Google Cloud 的追蹤基礎設施通訊。當您想深入了解系統內部或外部的單個請求的具體細節時,分散式追蹤是理想的選擇。
2018 年初的第二部影片探討了使用 Micrometer 收集指標。
Micrometer 是一種捕獲關於您的應用程式的指標(統計資訊)的抽象概念,然後可以從 Spring Boot Actuator 的 /actuator/metrics 端點取得,或轉發到時間序列資料庫(例如 Wavefront)。Micrometer 也可以與其他時間序列資料庫通訊,例如 AppOptics、Azure Monitor、Netflix Atlas、CloudWatch、Datadog、Dynatrace、Elastic、Ganglia、Graphite、Humio、Influx/Telegraf、JMX、KairosDB、New Relic、Prometheus、SignalFx、Google Stackdriver、StatsD。當您想捕獲統計資訊(關於給定 HTTP 端點被訪問的頻率的彙總數字,或 HTTP 端點傳回特定狀態碼或回應特定 HTTP 動詞)時,指標非常有用。
這是一個快速回顧。如需更深入地了解這兩者,我建議您參考這兩部 Spring 提示影片。這就是它們存在的原因!Wavefront 的美妙之處在於,您不會在本期中與這些專案的 API 互動,因為正如我們即將看到的,Wavefront Spring Boot 整合就是能運作。這並不令人意外:Spring Boot 團隊努力使 Wavefront 整合能夠無縫運作。Wavefront 還有適用於大量不同平台、執行時間和專案的其他整合。
注意:我將支援的其他整合的看似無止境的清單貼到一個巨大的螢幕截圖中,您可以在此部落格的底部找到它。它將是長度比部落格本身長十倍的圖像。
讓我們使用 Spring Initializr 建構一個新專案。您必須使用大於 Spring Boot 2.3.M4 的 Spring Boot 版本。選擇 R2DBC、PostgreSQL、Reactive Web、Spring Cloud Sleuth 和 Lombok。點擊 Generate,解壓縮產生的檔案。當我撰寫本文時,它可以很好地使用 Spring Cloud Hoxton SR3。無需使用快照版本。此外,我們需要新增 Wavefront starter 本身。將以下依賴項新增到 pom.xml。
    <dependency>
        <groupId>com.wavefront</groupId>
        <artifactId>wavefront-spring-boot-starter</artifactId>
        <version>2.0.0-SNAPSHOT</version>
    </dependency>
Wavefront Spring Boot starter 是一個 SNAPSHOT 依賴項 - 如果我們不敢冒險,它就不會是 Spring 提示影片!在撰寫本文時,該依賴項位於 Sonatype SNAPSHOTS 儲存庫中。我需要在我的建構中包含以下 Spring 和 Sonatype 儲存庫。誰知道呢?也許當您閱讀本文時,一切都已正式發布。在這些 bootiful 的地方,事情進展得很快!
    <repositories>
        <repository>
            <id>sonatype-snapshots</id>
            <name>Sonatype Snapshots</name>
            <url>https://oss.sonatype.org/content/repositories/snapshots/</url>
            <snapshots>
                <enabled>true</enabled>
            </snapshots>
        </repository>
        <repository>
            <id>spring-milestones</id>
            <name>Spring Milestones</name>
            <url>https://repo.spring.io/milestone</url>
        </repository>
        <repository>
            <id>spring-snapshots</id>
            <name>Spring Snapshots</name>
            <url>https://repo.spring.io/snapshot</url>
            <snapshots>
                <enabled>true</enabled>
            </snapshots>
        </repository>
    </repositories>
    <pluginRepositories>
        <pluginRepository>
            <id>spring-milestones</id>
            <name>Spring Milestones</name>
            <url>https://repo.spring.io/milestone</url>
        </pluginRepository>
        <pluginRepository>
            <id>spring-snapshots</id>
            <name>Spring Snapshots</name>
            <url>https://repo.spring.io/snapshot</url>
            <snapshots>
                <enabled>true</enabled>
            </snapshots>
        </pluginRepository>
    </pluginRepositories>
完成所有這些操作後,在您最喜歡的 IDE 中導入專案。
該應用程式是一個典型的反應式 Spring Boot 應用程式,在觀看這麼多其他 Spring 提示影片後,您無疑已經熟悉了它,這些影片包括使用 Spring Framework 5.0 的函數式反應式 HTTP 端點、Spring Data R2DBC、測試反應式服務等等。以下是程式碼。
package com.example.wavefront;

import lombok.AllArgsConstructor;
import lombok.Data;
import lombok.NoArgsConstructor;
import org.springframework.boot.ApplicationRunner;
import org.springframework.boot.SpringApplication;
import org.springframework.boot.autoconfigure.SpringBootApplication;
import org.springframework.context.annotation.Bean;
import org.springframework.data.annotation.Id;
import org.springframework.data.repository.reactive.ReactiveCrudRepository;
import org.springframework.web.reactive.function.server.RouterFunction;
import org.springframework.web.reactive.function.server.ServerResponse;
import reactor.core.publisher.Flux;

import static org.springframework.web.reactive.function.server.RouterFunctions.route;
import static org.springframework.web.reactive.function.server.ServerResponse.ok;

@SpringBootApplication
public class WavefrontApplication {

    public static void main(String[] args) {
        SpringApplication.run(WavefrontApplication.class, args);
    }

    @Bean
    RouterFunction<ServerResponse> routes(ReservationRepository rr) {
        return route()
                .GET("/reservations", r -> ok().body(rr.findAll(), Reservation.class))
                .GET("/hello", r -> ok().bodyValue("Hi, Spring fans!"))
                .build();

    }

    @Bean
    ApplicationRunner runner(ReservationRepository reservationRepository) {
        return args -> {

            var data = Flux
                    .just("A", "B", "C", "D")
                    .map(name -> new Reservation(null, name))
                    .flatMap(reservationRepository::save);

            reservationRepository
                    .deleteAll()
                    .thenMany(data)
                    .thenMany(reservationRepository.findAll())
                    .subscribe(System.out::println);
        };
    }
}

interface ReservationRepository extends ReactiveCrudRepository<Reservation, String> {
}

@Data
@AllArgsConstructor
@NoArgsConstructor
class Reservation {

    @Id
    private String id;
    private String name;
}
我們需要在 src/main/resources/application.properties 中指定一些 PostgreSQL 資料庫的配置資訊。
spring.r2dbc.url=r2dbc:postgresql://127.0.0.1/orders
spring.r2dbc.username=orders
spring.r2dbc.password=orders
我們還需要在 src/main/resources/application.properties 中指定我們的應用程式如何向 Wavefront 識別自己。Wavefront 可以觀察多個應用程式。反過來,一個應用程式可以有多個服務。應用程式名稱是服務的邏輯分組。對於我們的應用程式,名稱將是 spring-tips,服務名稱將是 reservations。
wavefront.application.name=spring-tips
wavefront.application.service=reservations
好啦... 就是這樣!在您的 IDE 中或使用 mvn spring-boot:run 從命令列啟動應用程式。您會看到應用程式啟動並在控制台上顯示一些資訊,如下所示。
...

To share this account, make sure the following is added to your configuration:

    management.metrics.export.wavefront.api-token=58e749b5-ee60-4c0b-988e-458c6cb77b32
    management.metrics.export.wavefront.uri=https://wavefront.surf

Connect to your Wavefront dashboard using this one-time use link:
https://wavefront.surf/us/cY69hp561D

...
沒錯。就是這樣。當 Wavefront Spring Boot starter 啟動時,它會協商您的應用程式的 token。因此,在應用程式啟動時,您的儀表板已經準備就緒並等待您。Spring Boot Starter 甚至很貼心地在 ~/.wavefront_token 中為您捕獲 Wavefront token。後續執行將會讀取該資料。或者,您可以使用在控制台上列印的 Spring Boot 屬性,它也會參考該屬性。
您可能不想將 token 檢入您的 git 儲存庫。相反,最好使用環境變數或 Spring Cloud Config Server。想了解更多關於配置的資訊嗎?請參閱關於配置的 Spring 提示影片。
請記住最後一個 URL 以供日後參考。但首先,前往您的瀏覽器並執行一些端點,https://127.0.0.1:8080/reservations 和 https://127.0.0.1:8080/hello。在瀏覽器中調用它們各六次。
現在,前往該 Wavefront URL,您應該會看到一個包含您的應用程式資料的儀表板。如果沒有看到,請稍等片刻。需要幾分鐘才能看到從您的應用程式收集的資料。
您會立即看到 Wavefront 已經捕獲了關於您的應用程式的指標,包括應用程式層級(例如,它知道您的 HTTP 請求)以及 JVM 層級(例如,它知道您的 JVM 的記憶體使用情況)。

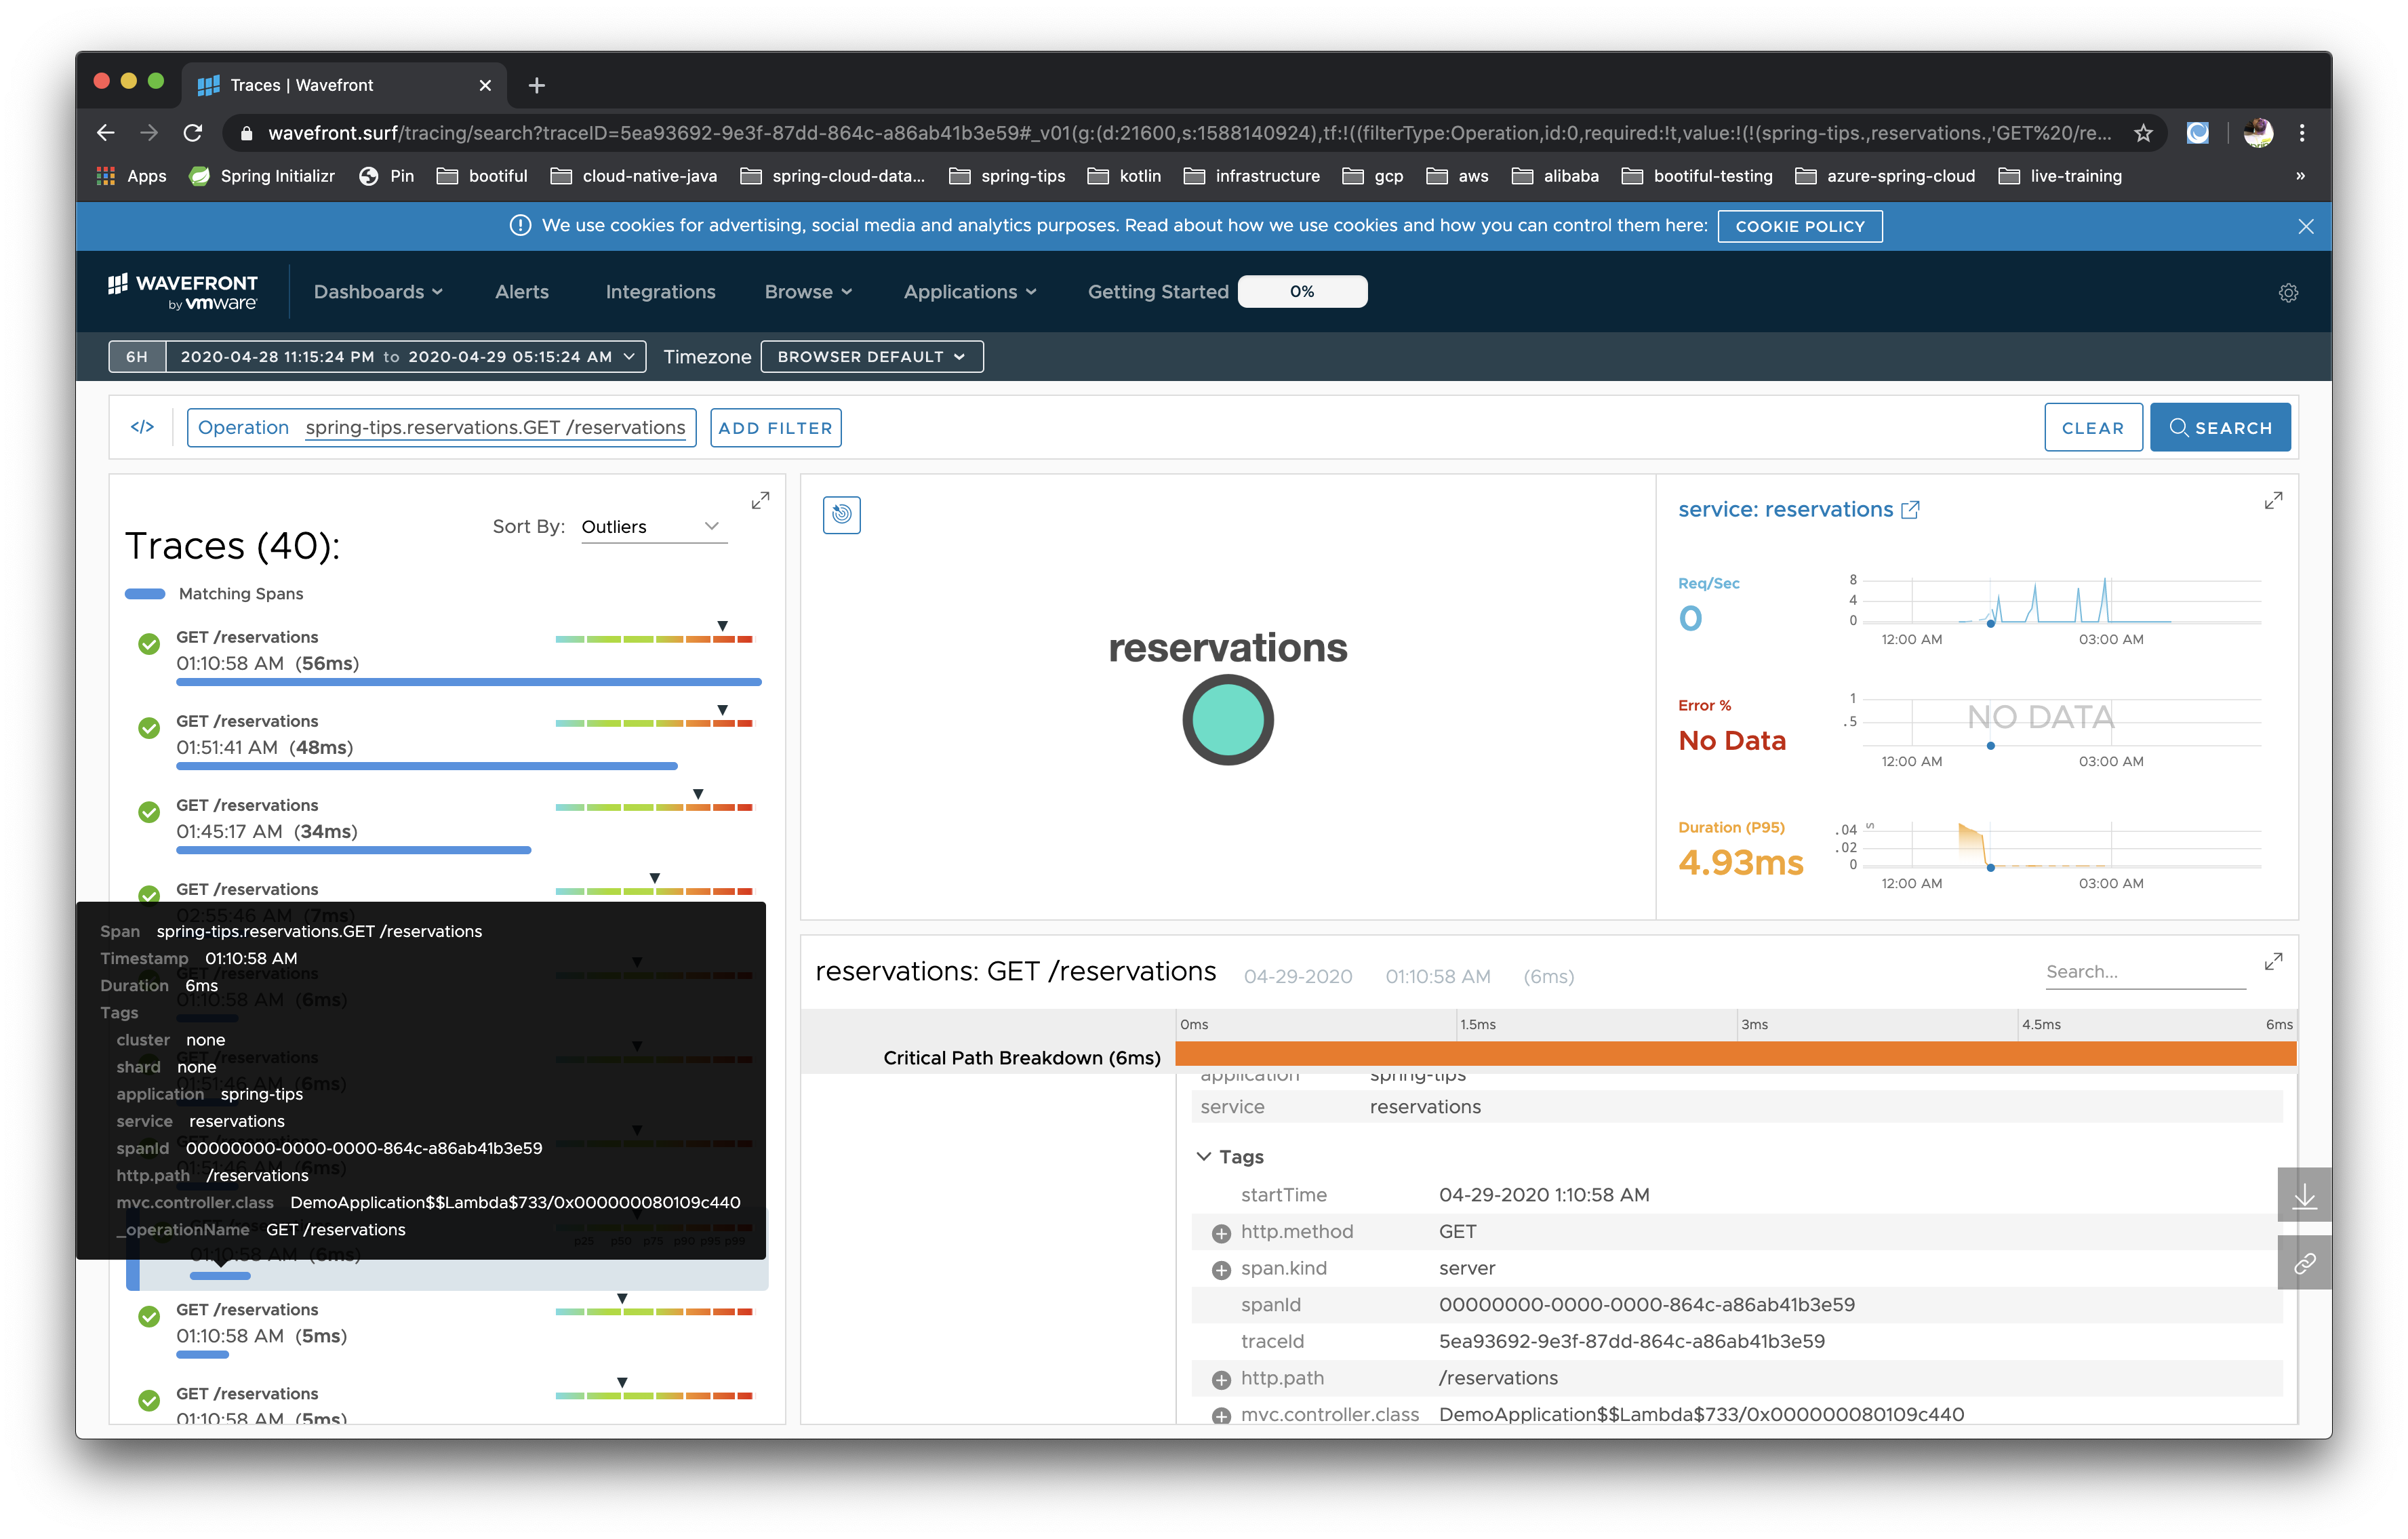
點擊其中一個 HTTP 請求或前往 Application > Traces,您將能夠深入了解您的應用程式的追蹤,如下所示。那裡也有大量資訊。
到目前為止,我向您展示的所有內容都是開箱即用的。真正的力量在於自訂和整合。您可以建立自訂儀表板來顯示對您重要的各種資訊。繪製有用的業務指標。使用圖表、時間序列等等。而且,一旦您確定了要操作的正確資料,並確定了如何最好地將資料置於上下文中,那麼安裝整合以在需要採取行動時提醒您就變得非常簡單。
說到整合,我保證會向您展示一些其他可用的整合。所以,這就是您禪修的時刻:適用於不是 Spring Boot(咦?)的罕見種類的其他整合的瘋狂清單。

還在這裡?...為什麼?走開!您有地方要去,有生產部署要品味,有成長要衡量。利用您今天在這裡學到的知識,將 Wavefront 整合到您的應用程式中。如果您使用的是 Tanzu Enterprise-ready Kubernetes Grid (Kubernetes)、Tanzu Application Service (Cloud Foundry) 或 Azure Spring Cloud,那麼這應該是一個特別誘人的機會。最後,一個可以像您的基於 Spring Boot 的微服務一樣擴展的可觀測性平台。所以,去吧。去試用 Wavefront。更快、更安全地進入生產環境。