
領先一步
VMware 提供培訓和認證,以加速您的進展。
了解更多現今,應用程式是以小型獨立的上游服務集合建構而成。這加速了開發,並讓模組專注於特定的職責,提高了它們的品質。這是使用微服務方法的主要優勢之一。然而,從一個服務跳到另一個服務可能會增加額外的延遲,而當服務沒有回應時,這種延遲可能會顯著增加。
如果您執行微服務,您會希望在上游服務無法正常運作時,防止呼叫它們。即使使用斷路器模式,也可能會在回應時間上產生懲罰。因此,有時最好主動檢查您的上游服務,以驗證它們在需要之前是否已準備就緒。
健康檢查是一種根據服務的狀態判斷服務是否能正確回應的方式,可以防止逾時和錯誤。
被動式健康檢查是在請求處理期間完成的。如果服務最終不健康,應用程式將傳回失敗,並將端點標記為不健康。這可能會增加額外的延遲。
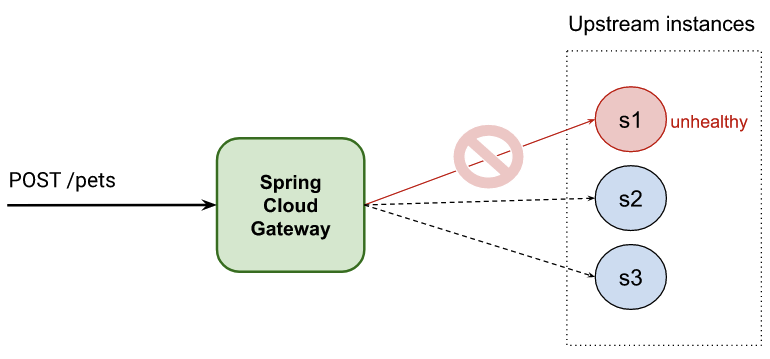
主動式健康檢查將在接收請求之前,在背景中檢查並捨棄不健康的服務。它不會增加額外的延遲。
最後但並非最不重要的是,這些功能可以與斷路器程式庫結合使用,以立即回退到替代端點,而不會遭受第一次錯失的懲罰。
目標是讓路由使用負載平衡策略將請求轉發到健康的下游服務。
這篇文章分為兩個部分
Spring 中有一些功能可以幫助您進行主動式健康檢查
Spring Cloud Gateway Spring Cloud Gateway 提供了一個程式庫,用於在 Spring 和 Java 之上建構 API 閘道。它透過 LoadBalancerClientFilter/ReactiveLoadBalancerClientFilter 全域篩選器支援上述功能。在這篇文章中,您可以看到使用這些全域篩選器之一的不同方式。
但是,首先,讓我們探索其中一些功能。
Spring Cloud 中包含了一個用於負載平衡的全域篩選器,可以透過使用特殊的 URI 表示法來啟動:lb://your-service-name。
spring:
 cloud:
   gateway:
     routes:
       - id: myRoute
         uri: lb://your-service-name
         predicates:
         - Path=/service/**
負載平衡器篩選器 ReactiveLoadBalancerClientFilter(適用於反應式應用程式)將偵測 URI,並將其替換為與「your-service-name」相關聯的可用端點。
請注意,您需要在服務發現註冊表中註冊「your-service-name」。我們將在後續章節中看到您可以執行此操作的不同方式。
預設情況下,流量會路由到上游服務,即使它們不健康也是如此。為了防止選擇到不好的服務,您可以啟用 Spring Cloud 的負載平衡器用戶端提供的 health-check 配置
    spring:
      cloud:
        loadbalancer:
          configurations: health-check
所有端點將透過自動使用 Spring Boot Actuator 健康端點定期檢查。您也可以自訂一些選項,例如 spring.cloud.loadbalancer.health-check.<your-service-name>.path 和 spring.cloud.loadbalancer.health-check.interval。
預設的健康檢查配置透過使用
/actuator/health端點來檢查上游服務端點,這需要在您的上游服務中啟用 Spring Actuator。
如需更多選項,請探索 LoadBalancerClientsProperties 和 LoadBalancerProperties 類別
Spring Cloud Gateway 中有一個內建功能,會將所有可用的服務部署為路由。這篇文章描述了相反的情況,因此我們正在宣告負載平衡的路由,包括主動式健康檢查。
在上一節中,您指定了一個負載平衡的 URI (lb://your-service-name),但現在您需要註冊與 URI 服務名稱相關聯的端點。我們將在以下章節中探討一些方法。
您可以透過配置 spring.cloud.discovery.client.simple.instances 屬性來靜態啟動用戶端負載平衡。它是一個映射,其鍵是服務名稱(由 lb:// URI 使用),值是指向上游服務的 org.springframework.cloud.client.ServiceInstance 物件陣列。
靜態負載平衡的一些優點包括
問題是您在配置中靜態設定了上游服務。如果您需要變更清單,則需要重新啟動您的應用程式。
範例
spring:
  cloud:
    gateway:
      routes:
        - uri: lb://hello-service # Load Balancer URI handled by ReactiveLoadBalancerClientFilter
          predicates:
            - Path=/hello
    loadbalancer:
      configurations: health-check # Required for enabling SDC with health checks
    discovery:
      client:
        simple: # SimpleDiscoveryClient to configure statically services
          instances:
            hello-service:
              - secure: false
                port: 8090
                host: localhost
                serviceId: hello-service
                instanceId: hello-service-1
              - secure: false
                port: 8091
                host: localhost
                serviceId: hello-service
                instanceId: hello-service-2
# Run server 1
SERVER_PORT=8090 ./gradlew :service:bootRun
# Run server 2
SERVER_PORT=8091 ./gradlew :service:bootRun
curl http://localhost:8090/actuator/health
{"status":"UP"}
curl localhost:8090/hello
{ "message": "hello world!"}%
./gradlew :1-service-disc-by-properties:bootRun
curl localhost:8881/hello
{ "message": "hello world from port 8090!"}%
curl localhost:8881/hello
{ "message": "hello world from port 8091!"}%
您可能需要多次執行先前的命令,才能從不同的伺服器獲得回應。
curl localhost:8090/status/false -X PUT
curl http://localhost:8090/actuator/health
{"status":"DOWN"}
您可能會收到一個來自埠號 8090 的回應,因為在您傳送請求時,健康檢查尚未檢查端點。間隔可以在屬性 spring.cloud.loadbalancer.health-check.interval spring.cloud.loadbalancer.health-check.interval 中修改
此外,您可以看到一些訊息,描述其中一個上游端點不健康,因此無法使用。
2023-05-08 14:59:53.151 DEBUG 9906 --- [ctor-http-nio-3] r.n.http.client.HttpClientOperations     : [12d42e83-77, L:/127.0.0.1:57439 - R:localhost/127.0.0.1:8090] Received response (auto-read:false) : RESPONSE(decodeResult: success, version: HTTP/1.1)
HTTP/1.1 503 Service Unavailable
curl localhost:8881/hello
{ "message": "hello world from port 8091!"}%
curl localhost:8091/status/false -X PUT
curl localhost:8881/hello
{"timestamp":"2023-05-08T13:07:48.704+00:00","path":"/hello","status":503,"error":"Service Unavailable","requestId":"6b5d6010-199"}%
擁有靜態配置不是很靈活,但使用 Eureka 作為服務發現可以消除這個缺點。
代價是您需要在架構中新增一個新的元件,這可能會增加您的維護負擔。對於某些客戶來說,這可能不是一個選項。
以下範例配置了 Eureka 整合
    spring:
      application:
        name: scg-client-with-eureka
      cloud:
        loadbalancer:
          configurations: health-check # Note: required for enabling SDC with health checks - remove this line if you want to reproduce issues because not using health checks in LB
          # Note: LoadBalancerCacheProperties.ttl (or spring.cloud.loadbalancer.cache.ttl) is 35 by default - You will need to wait 35secs after an instance turns healthy
        gateway:
          httpclient:
            wiretap: true
          routes:
            - uri: lb://hello-service
              predicates:
                - Path=/headers
              filters:
                - StripPrefix=0

    eureka:
      client:
        webclient:
          enabled: true
        serviceUrl:
          defaultZone: http://localhost:8761/eureka
        fetchRegistry: true
        registerWithEureka: false
      instance:
        preferIpAddress: true
./gradlew :eureka-server:bootRun
等待直到您看到 Eureka 伺服器已啟動
2023-06-26 12:51:46.901 INFO 88601 --- [ Thread-9] e.s.EurekaServerInitializerConfiguration : Started Eureka Server
eureka 配置檔的伺服器# Run server 1
SPRING_PROFILES_ACTIVE=eureka SERVER_PORT=8090 ./gradlew :service:bootRun
# Run server 2
SPRING_PROFILES_ACTIVE=eureka SERVER_PORT=8091 ./gradlew :service:bootRun
您應該從步驟 1 的伺服器記錄中看到伺服器執行個體已新增到 Eureka 中。
2023-06-26 12:52:50.805  INFO 88601 --- [nio-8761-exec-3] c.n.e.registry.AbstractInstanceRegistry  : Registered instance HELLO-SERVICE/192.168.0.14:hello-service:8090 with status UP (replication=true)
2023-06-26 12:53:29.127  INFO 88601 --- [nio-8761-exec-9] c.n.e.registry.AbstractInstanceRegistry  : Registered instance HELLO-SERVICE/192.168.0.14:hello-service:8091 with status UP (replication=true)
前往 http://localhost:8761/ 並檢查伺服器是否作為應用程式 hello-service 的執行個體包含在內
執行 Spring Cloud Gateway
SERVER_PORT=8883 ./gradlew :3-eureka-service-disc:bootRun
5. 測試 Spring Cloud Gateway 平衡器
curl localhost:8883/hello
{ "message": "hello world from port 8090!"}%
curl localhost:8883/hello
{ "message": "hello world from port 8091!"}%
curl localhost:8090/status/false -X PUT
您應該在 Eureka 儀表板中看到只有一個執行個體可用,並且您將看到一些記錄訊息抱怨埠號 8090 上的服務不可用。健康檢查不是立即的,因此您可能需要等待幾秒鐘才能看到執行個體標記為 DOWN。
如您所見,Spring Cloud Gateway 提供了一個選項,用於建立您自己的自訂篩選器。它也讓您可以在不重新啟動閘道的情況下應用篩選器和變更路由。
在本節中,您可以看到一個自訂篩選器實作,它透過使用 Spring Cloud Gateway 路由配置來設定服務的負載平衡和健康檢查。
如果您的專案中已經有一個服務發現伺服器,這可能不是您的最佳選擇。如果沒有,這是一個在您的專案中整合兩個強大功能的簡單且廉價的方法。
    spring:
      application:
        name: custom-service-disc
      cloud:
        loadbalancer:
          configurations: health-check # Note: required for enabling SDC with health checks - remove this line if you want to reproduce issues because not using health checks in LB
          # Note: LoadBalancerCacheProperties.ttl (or spring.cloud.loadbalancer.cache.ttl) is 35 by default - You will need to wait 35secs after an instance turns healthy
        gateway:
          routes:
            - uri: lb://hello-service
              id: load-balanced
              predicates:
                - Path=/load-balanced/**
              filters:
                - StripPrefix=1
                - LoadBalancer=localhost:8090;localhost:8091;localhost:8092
新的 LoadBalancer 路由篩選器讓您可以配置與 lb://hello-service 負載平衡器 URI 相關聯的上游服務端點
@Component
public class LoadBalancerGatewayFilterFactory extends AbstractGatewayFilterFactory<LoadBalancerGatewayFilterFactory.MyConfiguration> {

	// ...

	@Override
	public GatewayFilter apply(MyConfiguration config) {
		return (exchange, chain) -> {
			final Route route = exchange.getAttribute(GATEWAY_ROUTE_ATTR);
			if (StringUtils.hasText(config.getInstances()) && route.getUri().getScheme().equals("lb")) {
				config.getServiceInstances(route.getUri().getHost()).forEach(discoveryClient::addInstance);
			}

			return chain.filter(exchange);
		};
	}
如果路由符合 lb://<service-host> 模式,LoadBalancerGatewayFilterFactory 將把來自篩選器配置的所有上游服務端點與 service-host 關聯起來。
在底層,已包含一個新的 ReactiveCustomDiscoveryClient 發現用戶端實作,以管理我們程式碼中的上游服務端點。Spring 偵測到這樣一個 bean,並在用於確定可用端點的 DiscoveryClient 清單中優先處理它。
# Run server 1
SERVER_PORT=8090 ./gradlew :service:bootRun
# Run server 2
SERVER_PORT=8091 ./gradlew :service:bootRun
curl http://localhost:8090/actuator/health
{"status":"UP"}
curl localhost:8090/hello
{ "message": "hello world!"}%
SERVER_PORT=8882 ./gradlew :2-custom-service-disc:bootRun
curl localhost:8882/hello
{ "message": "hello world from port 8090!"}%
curl localhost:8882/hello
{ "message": "hello world from port 8091!"}%
您可能需要多次執行先前的命令,才能從不同的伺服器獲得回應。
curl localhost:8090/status/false -X PUT
curl http://localhost:8090/actuator/health
{"status":"DOWN"}
您可能會收到一個來自埠號 8090 的回應,因為在您傳送請求時,健康檢查尚未檢查端點。間隔可以在 spring.cloud.loadbalancer.health-check.interval 屬性中修改。
此外,您可以看到一些訊息,描述其中一個上游端點不健康,因此無法使用。
2023-05-08 15:59:53.151 DEBUG 9906 --- [ctor-http-nio-2] r.n.http.client.HttpClientOperations     : [12d42e83-77, L:/127.0.0.1:57439 - R:localhost/127.0.0.1:8090] Received response (auto-read:false) : RESPONSE(decodeResult: success, version: HTTP/1.1)
HTTP/1.1 503 Service Unavailable
curl localhost:8882/hello
{ "message": "hello world from port 8091!"}%
curl localhost:8091/status/false -X PUT
curl localhost:8882/hello
{"timestamp":"2023-05-08T14:07:48.704+00:00","path":"/hello","status":503,"error":"Service Unavailable","requestId":"6b5d6010-199"}%
在這篇文章中,您已經看到了在您的專案中獲得負載平衡和主動式健康檢查的多種方法。
總而言之,您也看到了如果您不需要為架構新增額外的元件,Spring Cloud Gateway 方法是一個很好的選擇。
想進一步了解 Spring Cloud 嗎?請加入我們的 Spring 學院 線上課程!
想要僅透過在您的路由中新增一個屬性來獲得主動式健康檢查,而無需自己動手操作嗎?請查看我們支援 Kubernetes 的 商業平台。